Linux How To
- Generate secure passwords in Linux Click here
- Encrypt and Share Files With GPG Click here
- Apache2 Custom Site With Self Signed Certificate Click here
For this activity, we will use a Debian 12 VM with apache installed. The debian installer gives us an option to install a web server (among other things) during the installation process. In case we need to install apache2 after the machine has booted up, it can be done with apt install apache2.
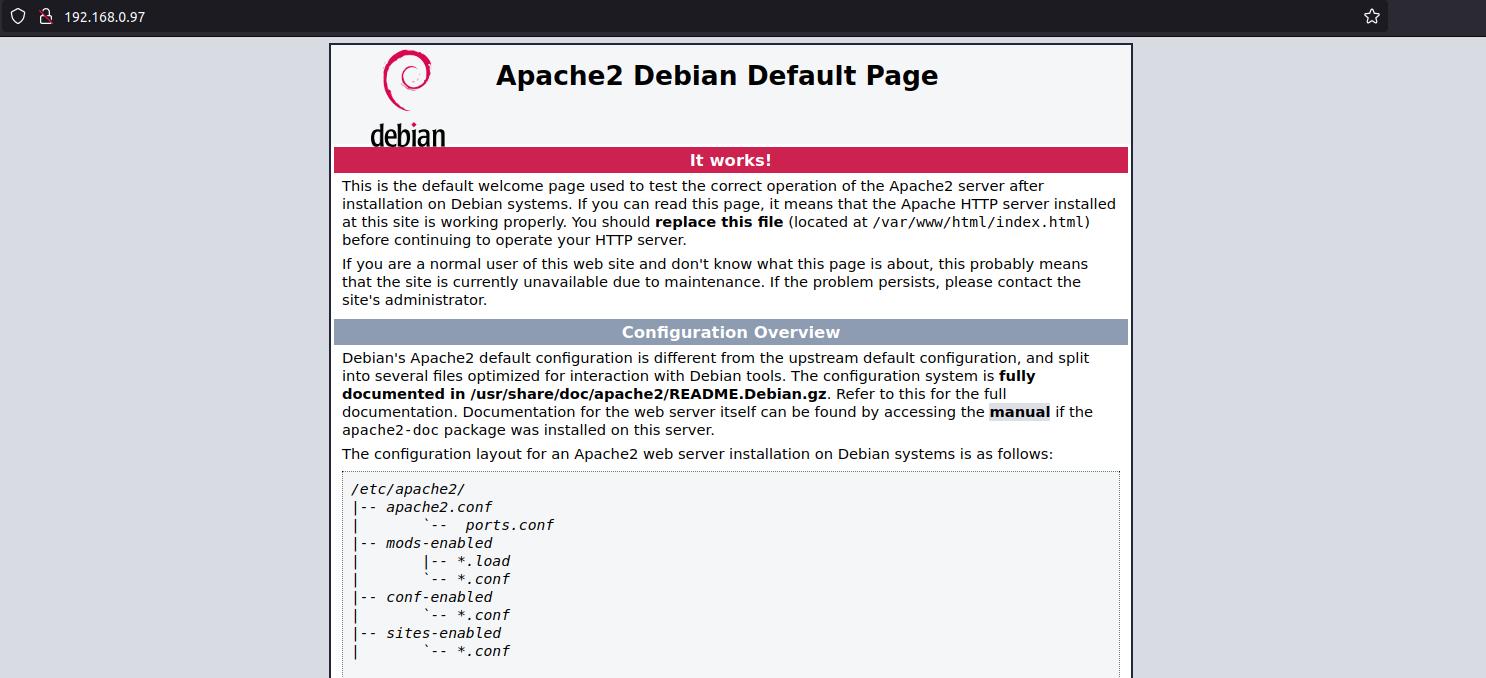
Either way, once you have apache installed, we can go to http://your_server_ip and we’ll get the default apache landing page as show inthe screen grab below.
Our task here is to host a sample site on the machine and enable access to it via https://server_ip.
By default, /var/www/html is the document root directory (web root) for apache. This is the main directory where apache looks for files to serve to clients requesting them.
We will start with creating a directory for our site under var/www/.
sudo mkdir /var/www/oursamplesite
If we do a directory listing with ls -l /var/www, we can see that our newly created directory is owned by root, as show in the screen grab below.

We need to change the ownership of this directory to www-data. www-data is the usr that apache use by default for normal operation. Apache can access any file/directory that www-data can access. We can change the owneship of the newly created directory with the command
sudo chown -R www-data:www-data /var/www/oursamplesite
Now that we have the directory ownership changed, we will add our current user havoc to the www-data group with the command
sudo usermod -aG www-data havoc
Now we need to set persmissions for apache and havoc to write and read files in the newly created directoy. This is accomplished with the following command
sudo chmod -R 770 /var/www/oursamplesite
user havoc will need to log out and then login again for new group permissions to take effect.
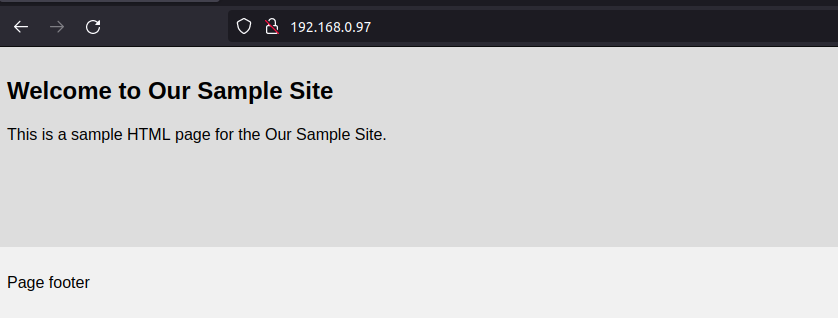
With the required ownership and permissions set, we now proceed to put a sample HTML page there by creating an index.html file.
sudo nano /var/www/oursamplesite/index.html
<!DOCTYPE html>
<html>
<head>
<title>Welcome to Our Sample Site</title>
<!-- The <style> tag is not required, but who doesn't like a little style-->
<style>
* {
  box-sizing: border-box;
  font-family: Arial, Helvetica, sans-serif;
}

body {
  margin: 0;
  font-family: Arial, Helvetica, sans-serif;
}

/* Style the top navigation bar */
.topnav {
  overflow: hidden;
  background-color: #333;
}

/* Style the topnav links */
.topnav a {
  float: left;
  display: block;
  color: #f2f2f2;
  text-align: center;
  padding: 14px 16px;
  text-decoration: none;
}

/* Change color on hover */
.topnav a:hover {
  background-color: #ddd;
  color: black;
}

/* Style the content */
.content {
  background-color: #ddd;
  padding: 10px;
  height: 200px; /* Should be removed. Only for demonstration */
}

/* Style the footer */
.footer {
  background-color: #f1f1f1;
  padding: 10px;
}
</style>
</head>
<body>
    <div class="content">
        <h2>Welcome to Our Sample Site</h2>
        <p>This is a sample HTML page for the Our Sample Site.</p>
    </div>
    <div class="footer">
        <p>Page footer</p>
    </div>
</body>
</html>
We now have to configure our apache virtualhost config to serve our site’s content. We do this by creating a file oursamplesite.conf in the /etc/apache2/sites-available/ directory.
sudo nano /etc/apache2/sites-available/oursamplesite.conf and put the following content in it.
<VirtualHost *:80>
    ServerName oursamplesite
    DocumentRoot /var/www/oursamplesite

    <Directory /var/www/oursamplesite>
        Options Indexes FollowSymLinks
        AllowOverride All
        Require all granted
    </Directory>

    ErrorLog ${APACHE_LOG_DIR}/oursamplesite_error.log
    CustomLog ${APACHE_LOG_DIR}/oursample_access.log combined
</VirtualHost>
We can check for any errors in the config file with sudo apachectl -t. If our config file has no errors, we will get the message Syntax OK.
Enable the site with sudo a2ensite oursamplesite.conf.
Disable the default apache2 landing page with sudo a2dissite 000-default.conf.
Restart apache with sudo systemctl restart apache2.
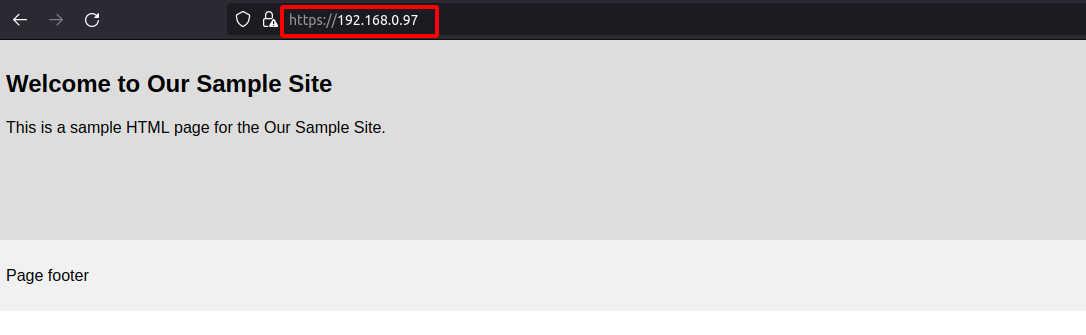
Verify that the new site is up and running by going to https://server-ip.
If we have firewall enabled on our server, we will configure it to open port 80 with sudo ufw allow "WWWW". For IPTABLES, the equivalent command is iptables -I INPUT -p tcp --dport 80 -j ACCEPT and for firewalld. it would be:
firewall-cmd --add-port=80/tcp --permanent
firewall-cmd --reload
We will use self signed certificates since we are running the web server in our local network. If we have to expose our site to the internet, there are ways to do this with NGINX Reverse Proxy or Cloudflare tunnels.
sudo mkdir /etc/ssl/oursamplesite
sudo openssl genrsa -out /etc/ssl/oursamplesite/oursamplesite-private.key 4096
sudo openssl req -new -key /etc/ssl/oursamplesite/oursamplesite-private.key \
-out /etc/ssl/oursamplesite/oursamplesite-csr.pem \
-subj "/C=US/ST=CL/L=California/O=OurSampleSite/CN=oursamplesite"
Of these parameters above, the most important one is CN=oursamplesite. Please ensure that you edit it to whatever is the domain name you want to use.
sudo openssl x509 -req -days 3650 -in /etc/ssl/oursamplesite/oursamplesite-csr.pem \
-signkey  /etc/ssl/oursamplesite/oursamplesite-private.key -out /etc/ssl/oursamplesite/oursamplesite-cert.crt
After executing these commands (use sudo with these commands unless you are running as root), we will have the following files in our /etc/ssl/oursamplesite directory.

sudo a2enmod ssl
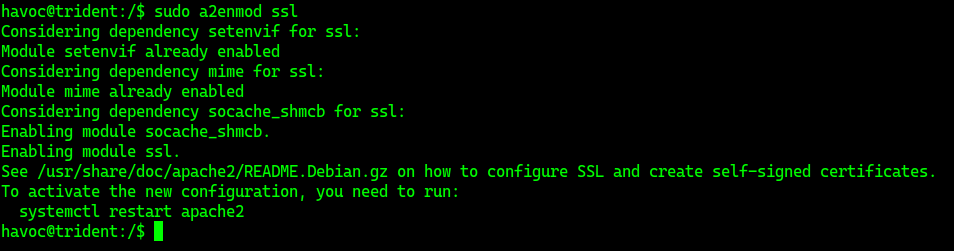
Confirm with apachectl -M | grep ssl. You should get an output ssl_module (shared) if all is well.

Edit the file we created earlier, /etc/apache2/sites-available/oursamplesite.conf
<VirtualHost *:80>
    ServerName oursamplesite
    Redirect permanent / https://192.168.0.97/
    #DocumentRoot /var/www/oursamplesite
</VirtualHost>

<VirtualHost *:443>
    ServerName oursamplesite

    SSLEngine on
    SSLCertificateFile /etc/ssl/oursamplesite/oursamplesite-cert.crt
    SSLCertificateKeyFile /etc/ssl/oursamplesite/oursamplesite-private.key

    DocumentRoot /var/www/oursamplesite

    <Directory /var/www/oursamplesite>
        Options Indexes FollowSymLinks
        AllowOverride All
        Require all granted
    </Directory>

    ErrorLog ${APACHE_LOG_DIR}/oursamplesite_error.log
    CustomLog ${APACHE_LOG_DIR}/oursample_access.log combined
</VirtualHost>
sudo a2enmod rewrite, check for errors with sudo apachectl -t and restart apache2 with sudo systemctl restart apache2
If required, update firewall rules with the following commands as applicable
ufw allow "WWW Secure"
iptables -I INPUT -p tcp --dport 443 -j ACCEPT
firewall-cmd --add-port=443/tcp --permanent
firewall-cmd --reload
That’s it. The self signed certificate we generated will however not be trusted by the browser and you will need to add an exception when your browser of choice displays a warning to that effect.
You can now navigate to https://server_ip to access our site. Even if we use HTTP to navigate to our site, the Redirect statment in our config file will redirect the connection to HTTPS.
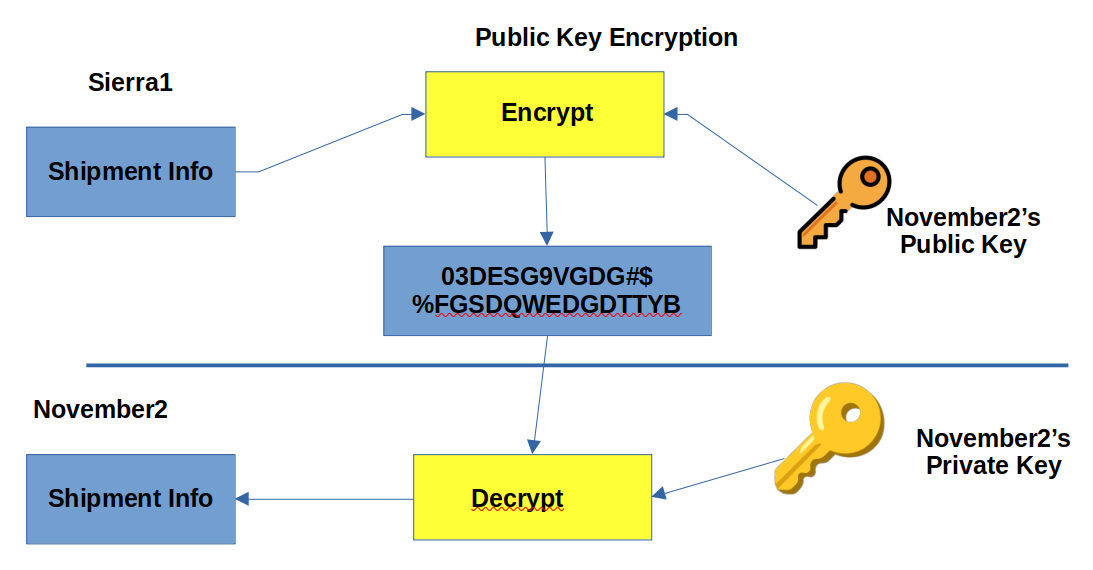
Today, we will look at encrypting and sharing files securely using gpg. GnuPG (GPG) is a tool used to encrypt data and create digital signatures.
For our exercise, we will consider two users on two different linux systems. They are running a mustard smuggling operations out of an undisclosed location and need to share information securely, to avoid any interception by Mustardpol. 😉
User1 : sierra1 with email sierra1@mustardops.org User2 : november2 with email november2@mustardops.org
The workflow goes as follows:
sierra1 wants to send details of the next shipment of mustard to november2. Both these guys needs to create their own key pairs (public and private) on their respecive systems. Once the key pairs have been generated, they will share their repective public keys with each other. (We will assume that they can do so by using rsync). Sharing public keys can be done via open communication channels like email, but there should be a mechanism by which you have the assurance that the public key does belong to the person with whom you wish to share information with.
The private keys, however should never be shared and should be stored securely.
User1 and User2 generates their own key pairs with the following command:
gpg --full-generate-key
They answer the prompts generated by gpg and end up with their key pair. We can list our key pairs with:
gpg --list-public-keys
gpg --list-secret-keys # displays the private keys
Public Key Listing (User1)

Private Key Listing (User1)

The same comands as above will be executed by User2, substituting the name and email address parameters.
Public Ket Listing (User2)

Private Key Listing (User2)

They will now need to export their public keys into a file and share those with each other. This is done with the fillowing command:
gpg --export -o sierra1.key 68A14F32098A4698C1DF53C631E2FFFE296EA030
# the last paramater is the key ID which is displayed when we list the kseys with the -list-keys option above
Now that they have shared their public keys with each other, they need to import the public keys into their respective system’s public keyring with the following command.
gpg --import sierra1.key # User2 will execute this command on his system
gpg --import november2.key ## User1 will execute this command on his system
The next step will be encrypting files and sending them to the recipeint. Lets say that User1 want to send a text file mustard_shipments.txt to User2. He will do so with the follwing command:
gpg -e -r november2@mustardops.org mustard_shipments.txt
This command will create a file named mustard_shipments.txt.gpg, which can be send to the recipient. The recipient can now decrypt the file with the following command:
gpg -d mustard_shipments.txt.gpg
## store the decrypted data in shipment.txt
gpg -d -o shipment.txt  mustard_shipments.txt.gpg
We can use gpg to encrypt a file with gpg -c file_to_be_encrypted.txt. You will be prompted for a password during the encryption process. This command will create an encrypted file named file_to_be_encrypted.txt.gpg.
⚠️ If the file you are encrypting contains really sensitive data, you should erase the original file securely once it hs been encrypted.
To decrypt the file use gpg -d file_to_be_encrypted.txt.gpg
You can delete a user’s GPG Keys from your system with the following command(s):
gpg --delete-secret-key november2@mustardops.org
pg --delete-key november2@mustardops.org
There are many utilities in Linux that help us in generating random passwords. The neccessity of having a strong password is well known. The problem with random passwords is that it is nearly impossible for us remember them. Using a password manager like KeePassX or KeePass2. That way, you only have to remember one password, the master pasword to unlock your password vault. This leads to another monkey’s tail scenario. If we loose/forget the master password, we you’re doomed.

You can use OpenSSL to generate a random password for you with the following command:
    openssl rand -base64 20
    # This command will generate a random 20 character long password as shown below.
XAOuOA3ZE+RnHxHqo8tAJgT0p8k=
We can generate randomg passwords with /dev/urandom like so
sudo < /dev/urandom tr -dc A-Za-z0-9 | head -c20; echo
# here we are using the alphanumeric charset with a length of 20 chars
PsZo8QTxYwv5aoc2rxR1
pwgen -ysBv 20 -n1
# we are geerating a 20 character long password. alter the -n parameter to generate more passwords
9h$FR{v/*7.z$/$9zfx-
We can generate random secure passwords with gpg using the following command. We will specify s length of 20 chars.
gpg --gen-random --armor 1 20
# this command will generate a secure, random base64 encoded apssword
B0nKqkHe/lJnu0Z6npYxvUILgYw=
date +%s | sha256sum | base64 | head -c 20 ; echo
OWE3ZjY3YjY0MjZiZDVi
date | md5sum
b796eaba55e90433a3f8041203b338b4
xkcdpass is not installed by default, (atleast on Debian 12 on which I’m running these commands.) it can be installed via apt install kkcdpass. This proram will generate a list of words which you could use as your passphrase.
havoc@trident:~$ xkcdpass
palpitate arguable popper renegade eclipse boned
diceware functions in a manner similar to xkcdpass.
havoc@trident:~$ diceware
AmbushUnworldlyUnmadePoachCofounderDisown
you can specify the wordlist to use with the --wordlist parameter like so:
havoc@trident:~$ diceware --wordlist en_eff
FitHungerTrillionLevelDrinkableJarring
Use any of these utilities to generate your passwords. You could use a passwords manager to store these passwords. Keepass2 has an inbuilt password manager you can use to generate passwords. ⚠️Pick your poison, stay safe online. Whereever possible, use 2FA (Two Factor Authentication). Store your backup codes (yes, you can download your backp codes for your online services, which can be used when you don’t access to your 2FA devices. I once lost access to my dropbox because I didnt have my backup codes 😢) in a secure location and manner.